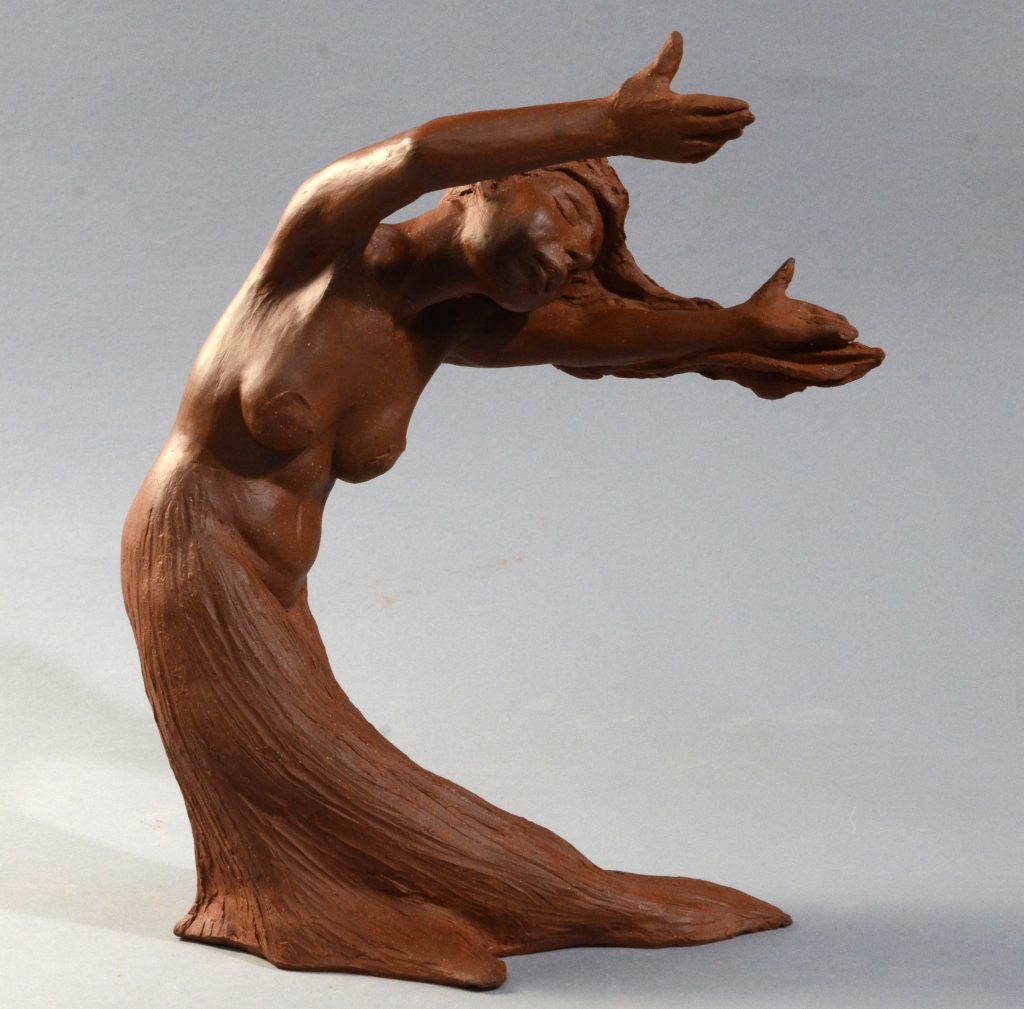
I have always been fascinated by how our bodies, and in particular, our arms and shoulders silently communicate our thoughts and emotions. Working with clay brings us to the fact that the arms are the most slender part of the body, and thus pose some serious technical issues when we create a composition.
One of the first things people ask is whether I use wires or some sort or armature. There are some materials where an armature can be helpful, for example, molding in wax to create a sculpture in bronze, or using some of the modern polymer clay bodies, but unfortunately, natural clay shrinks during drying and firing. This can be reduced by the use of either grog, or “paper clay”, which uses paper or cellulose fibers mixed with the clay to reduce shrinkage. However, with most clay bodies, a fixed armature causes the figure to crack apart as the drying clay pulls away.
However, there are some other useful tricks to creating fluid, graceful arms.
I often start out by building the arms and hands themselves, separate from the figure. This allows me to get the right form and proportions, flowing from the upper arm, the elbow, the muscles of the forearm, to the bulk of the hand. It also allows me to set the two arms side by side, so I start from the beginning with the two being the same size!
Clay bodies with higher grog content are often used for sculpture, since the grog not only adds strength to the clay (especially as it is drying), it also helps to even out drying and reduce shrinkage. The grog sometimes makes it more challenging to get a smooth, burnished surface, but it can still be done, as long as you finish the surface before the clay gets too dry and hard.
The more vertical the arm is (lifted up or hanging down), the more structurally stable it will be as the clay is still soft. But, you can create poses with the arms in different positions.
I have an old hair drier which I use to encourage the clay to dry a little faster. This can be tricky though, since the outer surface of the clay starts to stiffen before the core of the arm. This helps the clay to hold up, but any little movement immediately results in the stiffer shell cracking around the softer interior clay. It can also result in the arms drying too quickly, with the result that they are too stiff to move while the rest of the sculpture is still in flux.
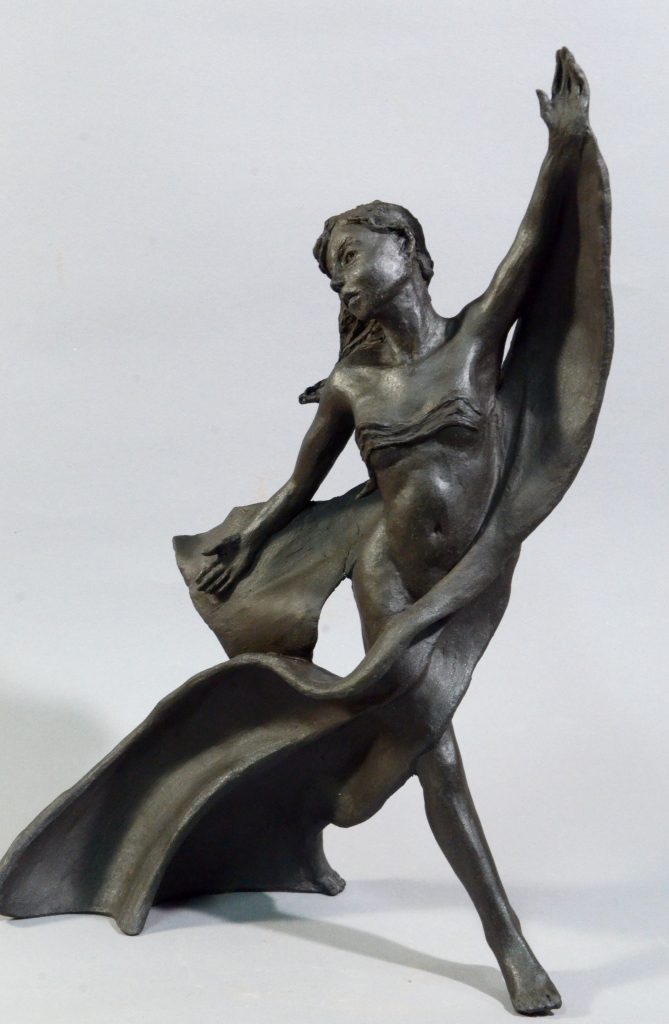
You can also support an outstretched arm using some other feature, such as a garment, or flowing hair. Sometimes the figure is holding on to something with both hands, so that the two arms are supporting each other.
As the clay is initially beginning to turn leather-hard, it is often possible to prop up an arm or hand with an external stick, wedged under the feature. It helps to put a small ball of clay over the end of the stick to cushion it, so it doesn’t gouge into the arm. I have a wide variety of different sized props to use for this.
It helps to have some large foam pieces where you can lay the entire figure down as you are working on it. You can use smaller blocks of foam, wedged into different areas, to follow the curve of the figure. This gives some time for the clay to start to dry and stabilize until the figure can stand up on its own.
As the figure begins to dry, the process takes on an entirely new set of challenges. The biggest challenge is keeping the drying uniform across the piece, so that as the clay shrinks, it doesn’t create warping and cracking.
One way to support the hand and arm is to rest it on something, either on the figure’s body, or another component of the sculpture. However, the fact that the arm is much thinner than the rest of the figure means that the arm will start to dry–and shrink–much more quickly than the rest of the body. This creates movement and stresses which can lead to cracking in the shoulder, wrist, or elbow, or by pulling the hand away from whatever it is supposed to be resting on. One way around this problem is to take a small piece of plastic bag and loosely wrap it around the arm to slow down the drying. Be careful to not leave the plastic on too long, or you will end up with the opposite problem of the arm not shrinking enough to keep up with the rest of the torso.
This is another place where higher grog content can help in the process. The grog not only adds strength, but it reduces the clay body’s shrinkage, and therefore, warping and cracking. It also helps the clay dry more evenly.
For very small features, like extended fingers, it is sometimes possible to add a little bit of tissue paper to a small lump of clay. Experiment with different amounts of tissue, and make sure it is well worked into the clay. This will add some strength to the clay as it dries. It also reduces shrinkage, which is helpful if you have to go back and alter/repair some feature after the rest of the piece has started to dry.
Creating fluid, graceful poses in sculpture work in clay is a delightful process. One of the advantages of clay is that you can move it around as you are building the figure, in order to create a desired effect. However, the flexibility of the clay, especially in the beginning stages of a sculpture project, pose a daunting set of technical challenges. As an artist, you can address these challenges through a combination of trial and error, practice, experimentation, looking to what tricks others have learned, and maybe even a bit of luck. My encouragement to you is to not give up when a piece you are working on falls over on its face for the zillionth time, but to come back at it, trying something different, and eventually you will master the figure in your own distinctive way.
Hey it’s me LadySeshiiria from DA. I really enjoyed this article and I found it very insightful. I have a question for you though. It sounds like you air dry your clay? Am I correct? Or do you fire your clay after air drying it? I am not well versed in clay but I did take a class in high school and noticed that you could do both depending on the type of clay your working with. Like they have air dry clay’s and paper clay is sort of light paper mache in the way it dries.
Well, all earth clays have to be dried first. Any kind of moisture left in the clay does nasty things at 2000°F ;-). So yes, some clay bodies are designed to just air dry without firing (usually with some additives to give them more strength when dry), but even fired clay must first be “bone dry” before you put it in the kiln.
Hmm, now I know why our teacher always left artwork on the shelves all week.
YES. This is also one of the reasons why you need to hollow out pieces more than an inch thick — partly to make them dry faster, and partly to reduce the internal stresses from uneven heating as heat progresses from exterior to interior. Exploding sculptures are no fun!